Page 10 of 17
Re: Ollie's "BugEater" Build
Posted: Fri Jan 28, 2011 4:07 pm
by Chazz Layne
Nicely done, I might try something similar with mine if I don't rip the whole thing out and start over. I have hated my RAM setup since the day it showed up (with the wrong parts). It has been downhill from then on...
Re: Ollie's "BugEater" Build
Posted: Fri Jan 28, 2011 7:23 pm
by dzJeepchic
Great idea, simple solution to multiple problems. I like it. d
Re: Ollie's "BugEater" Build
Posted: Fri Jan 28, 2011 10:24 pm
by cruiserlarry
While I actually like my RAM mount, I think you're tray idea is good to save space. However, I pull my laptop in and out all day, so Velcro fasteners would get worn after a while, and a pain when new if you use enough to hold the laptop's weight - so a semi-permanent use would be more appropriate, IMO

(I use the low profile Ram mounts, which allow me to completely shut the laptop)
A suggestion for cooling the laptop - if your laptop fan pulls through the bottom (most don't anymore), locate that area on your tray and drill vent holes. I did this for my original Toughbook for the bottom-firing speaker, and it worked great, so I'm sure you'd get good ventilation for the fan too. Some laptops vent through the sides and / or rear, so the bottom venting (and Velcro) won't matter...
Re: Ollie's "BugEater" Build
Posted: Fri Jan 28, 2011 10:36 pm
by OLLIE
cruiserlarry wrote:While I actually like my RAM mount, I think you're tray idea is good to save space. However, I pull my laptop in and out all day, so Velcro fasteners would get worn after a while, and a pain when new if you use enough to hold the laptop's weight - so a semi-permanent use would be more appropriate, IMO
(I use the low profile Ram mounts, which allow me to completely shut the laptop)
A suggestion for cooling the laptop - if your laptop fan pulls through the bottom (most don't anymore), locate that area on your tray and drill vent holes. I did this for my original Toughbook for the bottom-firing speaker, and it worked great, so I'm sure you'd get good ventilation for the fan too. Some laptops vent through the sides and / or rear, so the bottom venting (and Velcro) won't matter...
I agree with all you said here Larry. I remove mine and reinstall it at least twice a day. When it wears out I'll switch to the dual lock tape. It has 10 times the life and 20 times the strength. I'll only have to use a fraction of the quantity. My laptop is vented out the back so the sealed bottom isn't an issue.
Re: Ollie's "BugEater" Build
Posted: Sat Feb 05, 2011 10:01 am
by OLLIE
There's a reason that I like various forums. If comments are constructive, you can get some good feedback. On a few of the sites I posted my RAM mount tray modification to people mentioned the vents on the computer not getting enough air. After examining the bottom of my computer more closely I realized that I did need to help my computer breathe better even though it's main vent is in the back. There are various vent areas on the bottom that the tray was covering. The air gets pulled in from the back then pushed through the computer out these other vents. So here's the mount tray after it's been modified for maximum breathablility for the computer. This set up will allow the the computer to breathe even better than when it's setting on a desk since the air will pass right through and not bounce off of a surface below the computer.
BEFORE: AFTER:
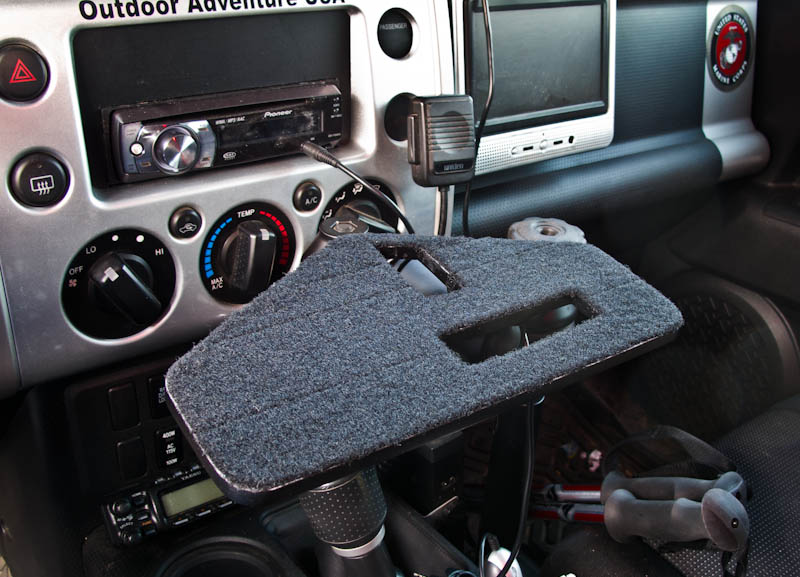
- 20110205-IMG_0700.jpg (130.51 KiB) Viewed 2870 times
Re: Ollie's "BugEater" Build
Posted: Sat Feb 05, 2011 10:56 am
by OLLIE
Re: Ollie's "BugEater" Build
Posted: Sat Feb 05, 2011 7:38 pm
by Willie H
Very nice Ollie.
Re: Ollie's "BugEater" Build
Posted: Mon Feb 07, 2011 8:06 am
by OLLIE
A friend of mine "funjunkie" gave me a complex with his comment below and I had to make a change.
without hearing the difference I gotta say I am not a fan. I admire the lengths you went to to make it ok, but man, kinda feel its on the far side of good. Just constructive criticism bro. not tryin to get down on ya. Kinda like the friend who has the balls to tell ya your breath stinks or ya got spinich on your tooth.
So I went out yesterday and moved my ScanGauge into the blank spot to improve the appearance. I actually like the location of the ScanGauge better now and does fill the void.
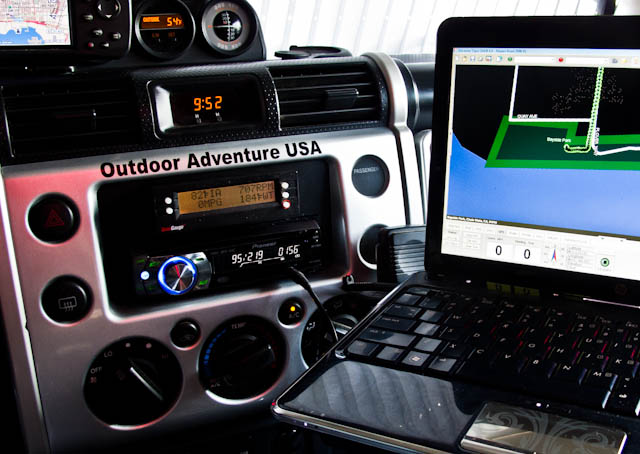
- ScanGage.jpg (106.48 KiB) Viewed 2831 times
Re: Ollie's "BugEater" Build
Posted: Mon Feb 07, 2011 6:59 pm
by Willie H
Does that say 8MPG?

Looks great though by the way!
Re: Ollie's "BugEater" Build
Posted: Tue Feb 08, 2011 1:44 pm
by OLLIE
Willie H wrote:Does that say 8MPG?
Looks great though by the way!

No... It says 0 MPG because I'm not moving.
When I'm moving it's lucky to see more than 11 MPG.