Donate

The HamRover Build

Share your outdoor adventure vehicle with us, give us all the details, show them off, share your mods, and tech information. This is where to put your build threads and upgrades.
User avatar
Chazz Layne
Posts: 703
Joined: Tue Aug 26, 2008 7:39 pm
Call Sign: KF7FEN
Location: Prescott, Arizona
Contact:

The HamRover Build

Post by Chazz Layne » Sat Jul 17, 2010 3:52 pm

As seems the case with most of the vehicles that get posted here, this one is far from done and probably never will be... :lol:

After years of running with the "big Jeep crowd", witnessing just how quickly you can take the challenge out of the trail and the endurance out of the vehicle (in terms of personal comfort and range), I realized I was really after more of an "expedition" vehicle. With that in mind, my search for a good platform landed me in the seat of a Discovery: not too much bigger than the Jeeps I was used to with just enough space and capacity to haul the gear I'd need on longer treks.

I had also seen far too many experienced drivers finesse a stock vehicle they knew well through something we had trouble tackling in our modified trucks. As a result I made a point to run my vehicle stock for a while and learn it inside and out before modifying anything -- a process I highly recommend and intend to repeat from now on. With this mindset, not much changed on the vehicle in the first 5 years.


Stock (mostly)

Image Image


As she sits now

Image Image


Specs

2004 Land Rover Discovery 2 HSE
Engine: 4.6L Rover V8
Drivetrain: perma-4WD, center diff-lock, stock axles
Suspension: 2-inch OME Heavy Duty lift kit and 1" Columbia Overland Spring Spacers
Tires: ProComp Xtreme AT 265/75R16 on NATO-spec LR wheels

Modifications to OEM Equipment
Rear coil spring conversion (SLS = GONE!)
Front swaybar quick-disconnects
Rear swaybar removed
55-watt HID conversion on the high beams
K&N air filter, exhaust resonator removed
Front bumper trimmed for improved approach
CD changer converted to AUX audio input
Red LED instrument illumination (almost done)
Rebuilt main under-hood wiring harness
Ripped-off rear bumper (BorregoFest carnage :mrgreen: )

Mods & Equipment
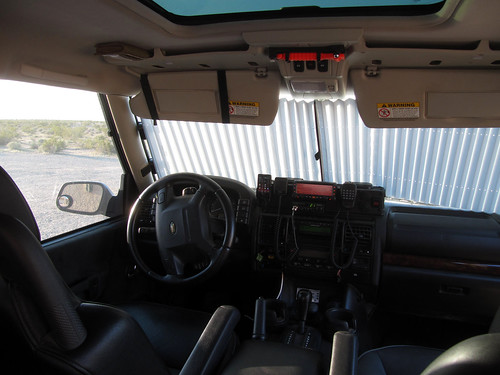
Yaesu FTM-350R 2m/70cm and Uniden Pro520XL CB radios
Custom dash pod for above comms
Custom RAM mount with HP netbook for navigation
Defender Rack with custom roof mount
Pelican Cases for waterproof/concealed roof wiring, and some storage
HLCfab rock sliders
Aluminum fuel tank skid plate
QT rear differential skid plate
Tom Wood's prop shaft
Odyssey 2150
LED rock lights
Columbia Overland stainless tail door panel w/flip-down table & LED work light
LifeHammer
Eclipse SunShade
Trash-a-roo II
WindowSox
Viair 450P compressor, tank, etc.

In Progress
Rear drawers/bunk
The Mule - with extended kitchen and living facilities

Future Plans
Front bull-bar w/winch (HLCfab?), RTE rear bumper w/hitch and removed factory hitch, underbody skid protection (oil pan, transmission, exhaust), lockers & 4.10 gears, upgraded axle shafts, RTE corrected radius arms, OME 3-inch HD lift kit (purely to maintain ride-height under the added weight), Mantec raised air intake, Engel MT35 freezer/fridge, tablet (replacing the netbook), lighting...

Pipe Dreams
Diesel swap, hover conversion, rocket launchers and machine guns...
Last edited by Chazz Layne on Mon Nov 08, 2010 10:40 am, edited 6 times in total.
Chazz Laynedotcom

User avatar
Chazz Layne
Posts: 703
Joined: Tue Aug 26, 2008 7:39 pm
Call Sign: KF7FEN
Location: Prescott, Arizona
Contact:

Post by Chazz Layne » Sat Jul 17, 2010 4:34 pm

Communications

Given the limited space, low dash, and stadium-style seating in the Discovery, the best solution for mounting additional displays and controls turned out to be a custom dash pod. This position on the dash allows for easy viewing on the road, no obstruction of the road from the driver's seat, and minimal permanent changes to the vehicle.

Image

The pod is built out of 1/8th-inch aluminum plate assembled and ground smooth to match the contour of the dash. On the top of the box, two small speakers provide better sound quality from the radios and conceal access to the only two bolts required for secure mounting. An internal frame holds the CB radio, power wiring, phone charger body (USB based), and the data/audio splitter for the phone (routed to the stereo for music playback). Surface-mounted on the face is a Pro-Clip cradle for my phone, microphones for the CB and amateur radios, the display/GPSr of the amateur radio, dual 12-volt power ports, and dual Anderson power poles.

Image Image

Underneath the passenger seat, a 1/4th-inch aluminum plate holds the guts of the amateur radio and other wiring where the original CD changer used to reside. An APO-3 cuts power to the aftermarket equipment before the battery's charge drops too low to start the vehicle, and a RIGrunner 4005 distribution block provides clean wiring and the ease of Anderson power poles.

Image

A slight trimming at the bottom of the "B" pillar allows antenna cable in protective conduit to slip in and up to the roof. The power cabling follows a similar route forward under the foot plate and passes through a factory-provided grommet in the firewall to the engine bay. Once through the firewall, the 8 AWG wire heads through a 40-amp circuit breaker for fuseless protection, and has ample capacity remaining for a planned carputer setup. While I was at it I cleaned up the melted factory wiring harness and upgraded to an Odyssey 2150.

Image
Chazz Laynedotcom

User avatar
Chazz Layne
Posts: 703
Joined: Tue Aug 26, 2008 7:39 pm
Call Sign: KF7FEN
Location: Prescott, Arizona
Contact:

Post by Chazz Layne » Sat Jul 17, 2010 5:14 pm

I still haven't figured out which front bumper to go to (required for a clean winch install). I like the look of the ARB, but I want something a bit tougher... probably something by HLCfab. In the mean time, I've trimmed the air dam off of the front bumper along a conveniently provided seam for improved clearance...

Image Image

...and added a Slickrock (JKS) Quick Disconnect for the front sway bar (rear is removed completely):

Image
Chazz Laynedotcom

User avatar
Chazz Layne
Posts: 703
Joined: Tue Aug 26, 2008 7:39 pm
Call Sign: KF7FEN
Location: Prescott, Arizona
Contact:

Post by Chazz Layne » Sat Jul 17, 2010 5:19 pm

I decided to give aluminum a try and see if it is really stout enough for a skid plate. The fuel tank's location makes it pretty well protected as long as the factory trailer hitch is in place, so I figured I'd start there. For a mere 18 added pounds, a rigid 1/4-inch plate now covers the fuel tank. After a few hits the skid shows no signs of giving way, and it will be welcome protection once I replace the rear bumper and remove the factory hitch.

Image Image
Chazz Laynedotcom

sdnative

Re: The HamRover Build

Post by sdnative » Sat Jul 17, 2010 6:27 pm

Very nice and tastefully done Chazz. I really like that dashpod, unfortunatelly mine has too much sweep to it to use something like that. How did you mount the plate under the seat? I have something similar, but am using 1/4" wood plate screwed into the floorboard.

User avatar
Chazz Layne
Posts: 703
Joined: Tue Aug 26, 2008 7:39 pm
Call Sign: KF7FEN
Location: Prescott, Arizona
Contact:

Post by Chazz Layne » Sat Jul 17, 2010 6:35 pm

Roof Rack, Antennas (and eventually lights)

Thanks to the factory roof bars, for about $20 a strip of aluminum flat bar made for a solid temporary antenna platform. Later when the roof rack was added, the bar was re-used as the front mounting bracket.

Image Image


I hate gutter mounts. I have yet to see a set that doesn't bend and twist the gutter, eventually ruining it. With the extra wide gutters on a Discovery, the problem is even worse. I also don't like the idea of putting too much weight up there, so I really didn't need the bulk or space of a full roof rack. Defender Racl makes a decent rack with an angled forward edge, available in a variety of sizes down to 3x4 feet (4x5 is just right). Mounting is by a custom through-the-roof setup for the 4 rear mounts, with the front 2 attached via the antenna bar shown above.

Image Image Image
Chazz Laynedotcom

User avatar
Chazz Layne
Posts: 703
Joined: Tue Aug 26, 2008 7:39 pm
Call Sign: KF7FEN
Location: Prescott, Arizona
Contact:

Re: The HamRover Build

Post by Chazz Layne » Sat Jul 17, 2010 6:40 pm

sdnative wrote:Very nice and tastefully done Chazz. I really like that dashpod, unfortunatelly mine has too much sweep to it to use something like that. How did you mount the plate under the seat? I have something similar, but am using 1/4" wood plate screwed into the floorboard.
We're having the same trouble finding places to put things in the Ranger, the dash is just too high and too curvy.

When I converted the CD changer input to use as an AUX input and removed the CD changer, I was left with 4 studs coming up out of the floorboards. If not for that, I probably would have tried to perma-mount bolts up through the floorboard for the same effect.
Chazz Laynedotcom

User avatar
Chazz Layne
Posts: 703
Joined: Tue Aug 26, 2008 7:39 pm
Call Sign: KF7FEN
Location: Prescott, Arizona
Contact:

Post by Chazz Layne » Sat Jul 17, 2010 7:50 pm

Lift & Tires

This was something I hesitated on for quite some time. I was satisfied with the vehicle's performance thus far. What I was not happy with was the little low-profile tires I had to run on the stock 18-inch wheels. Ultimately, it was the Navajo trip this past April that finally made me pull the trigger: I did not want to head out on a trip that long without suitable tires.

Thanks to the long radius arm design, Discoverys are easy and fairly inexpensive to lift up to about 3 inches. After some research into the various options available I settled on a 2-inch Old Man Emu kit (heavy duty) and a set of 265/75R16 (32-inch) tires on Land Rover's NATO-spec 16 inch steel wheels. The ride is smoother than stock, and the springs easily handle the added weight of water and all my gear.

Image Image Image


For tires I took Larry's recommendation and went with ProComp's XTreme AT, sort of a half MT half AT that rides quieter (and smoother) than a BFG AT on the highway. The combination has proved to be excellent on all sorts of terrain, plus the benefits of having a substantial sidewall and actually being able to air down for a change. So far the only downside I have noticed to the tires is they are semi-directional, but it is a small issue since it only causes a slight wobble at highway speeds to have them on backwards. I have not felt a need for a second spare, and will be buying these again when the current set wears out.

Image Image

I also had to add an extra inch since the ProComps are a little bit bigger than other 265/75s. This was accomplished with a Columbia Overland spacer kit, which is basically 4 aluminum hockey pucks that go in right under the spring mounts and longer bolts. Total increase in ride height with the current tires/lift is 5.5 inches, and the stance with the NATO wheels is about 4 inches wider.
Chazz Laynedotcom

User avatar
Willie H
Posts: 228
Joined: Mon Jan 05, 2009 6:30 pm
Call Sign: KJ6HEJ

Re: The HamRover Build

Post by Willie H » Sat Jul 17, 2010 10:32 pm

Nice write-up Chazz! You know how I feel about your truck.
KJ6HEJ
"So...Is this a response to a failed government"
FJ

User avatar
Chazz Layne
Posts: 703
Joined: Tue Aug 26, 2008 7:39 pm
Call Sign: KF7FEN
Location: Prescott, Arizona
Contact:

Re: The HamRover Build

Post by Chazz Layne » Sun Jul 18, 2010 11:03 am

Thanks, the compliments mean a lot after the blood and sweat put into this project (quite literally :lol: ).


Random Interior Goodies

Inspired by a similar project undertaken by Craig (Overland Navigator), and sympathizing over the missing tailgate, I set about getting a flip-down shelf added to the swing-out cargo door. Knowing that a drawer system was in the works, I went with a half-width shelf so I could put the slide-out fridge on that side and have an instant kitchen. Unable to find a low-profile LED light I liked, I picked up an LED strip and some aluminum C-channel to make one. The factory subwoofer wiring was recycled to power the light.

Image


I have OLLIE's BugEater build to thank for finding the next two items, the Eclipse SunShade (worth it's weight in gold during these summer months), and the LifeHammer. I only needed one 'Hammer, since the Disco's factory shelf has a wide flat spot that is too far back for a display...

Image Image

The SunShade also makes for cozy sleeping quarters at camp.
Chazz Laynedotcom

Post Reply

Return to “VEHICLES AND VEHICLE TECH”

Who is online

Users browsing this forum: No registered users and 1 guest