Donate

2022-01-27 OAUSA Reloading Net I & II

Off topic and general discussions that don't fit any of the above
User avatar
KK6DYO
OAUSA Board Member
Posts: 466
Joined: Thu Aug 29, 2013 9:07 pm
Call Sign: KK6DYO

2022-01-27 OAUSA Reloading Net I & II

Post by KK6DYO » Mon Jan 24, 2022 5:42 pm

I started reloading about 40 years ago and did so for about five years, mainly .22 Hornet, .357 Magnum, and .308 Winchester, using an RCBS Rock Chucker press, which is still available today.

Three-and-a-half years ago, knowing that two calibers I shoot (.480 Ruger and .458 SOCOM) were essentially online order only, and facing new California's laws, I got back into it. Proposition 63 changed California law to require background checks on every single ammunition purchase since July 1, 2019, essentially eliminating online sales. And who really wants California in your business? :lol:

The last reloading net was three years ago on January 17, 2019.

Techniques haven't changed, only availability and prices or components. For example, primers are now largely unavailable and sell for more than two times what they cost two years ago. And when components do become available, so many people get notification emails that they're gone within minutes.

Some primers at Midway USA:
PrimerPrices.png
PrimerPrices.png (285.38 KiB) Viewed 6239 times

These shortages of ammunition and components will presumably eventually end. However, the lesson to learn is not so hidden in the following dialog I saw a year ago on a firearm forum:
Dude One: "I can't find any .308 ammo! Where are you guys finding it?"
Dude Two: "In our closets, fool. Why didn't you stock up?"
We're going to restrict this reloading discussion to centerfire rifle and pistol cartridges, as I have no experience with shotgun shell loading, and rimfire cartridge reloading is somewhat esoteric. Reloading .22LR

I would like to point out a distinction between "handloading" and "reloading". The "handloader" aims to make better than factory ammo tuned specifically for his firearms, perhaps even special loadings that are not commercially available. The "reloader" is interested in lowering the cost of shooting by re-using brass and buying components in quantity, perhaps even casting his own bullets from scrap lead. You can of course be both a handloader and reloader. We'll call all of this endeavor "reloading" from this point on.

To organize, we're going to iterate through the process required to reload, discussing equipment at each step. There are many esoteric details (headspace determination) which could be discussed at each step which I've avoided, but might be interesting.

But first put on some safety glasses. We'll be using chemical solutions, fine powders, metal shavings, etc. You don't want any of these in your eyes.

User avatar
KK6DYO
OAUSA Board Member
Posts: 466
Joined: Thu Aug 29, 2013 9:07 pm
Call Sign: KK6DYO

Re: 2022-01-27 Reloading Net

Post by KK6DYO » Mon Jan 24, 2022 6:24 pm

I am going to assume that everyone is familiar with the components that make up centerfire pistol and rifle cartridges. The following diagrams are for reference. While the cases are sometimes made of other materials such as steel or aluminum, such cases aren't readily reloadable.

The primer pocket is the “hole” that holds the primer.

PistolCartridge.png
PistolCartridge.png (157.42 KiB) Viewed 6235 times

RifleCartridge.jpg
RifleCartridge.jpg (47.57 KiB) Viewed 6235 times

There is an incredible variety of cartridges that have been developed over the years, presumably for specific purposes other than marketing, or trying to get us to buy another firearm.

CartridgeComparisonGuide.jpg
CartridgeComparisonGuide.jpg (1.53 MiB) Viewed 6235 times

User avatar
KK6DYO
OAUSA Board Member
Posts: 466
Joined: Thu Aug 29, 2013 9:07 pm
Call Sign: KK6DYO

Re: 2022-01-27 Reloading Net

Post by KK6DYO » Mon Jan 24, 2022 6:48 pm

Step 1: Acquiring Cases / Brass

Brass can be acquired in three ways: 1) buying virgin brass, 2) saving your own fired cases from factory or reloaded ammo, or 3) scrounging fired brass from the ground. I've been at some ranges that sell or reload fired brass that seem to think any brass that hits the ground is theirs.


Checking various websites, brass (except the expensive stuff) seems to be in short supply. ...
NoslerBrass.png
NoslerBrass.png (132.13 KiB) Viewed 6235 times

The easiest way to save your own fired cases is by using a firearm that removes them in a controlled fashion, such as almost any non-semi-automatic. However, in attempting to keep your brass from flying too far, you might end up practicing in ways that are different than what you'd do in the field, such as too cautiously working a lever or bolt instead of quickly,as might be preferred in the field.

Perhaps the biggest problem is with semi-automatic firearms that forcefully eject brass, which might end up well to your side in front of or behind you. This is especially a problem at indoor ranges if your firearm throws brass well ahead of the firing line where you'll never be able to retrieve it.
In this case, it's probably easiest to simply catch your brass as it leaves the ejection port before it hits the ground, using various catchers. Caldwell makes a fairly reliable one for AR-15s that covers the ejection port.
CaldwellBrassCatcher.png
CaldwellBrassCatcher.png (390.34 KiB) Viewed 6235 times

Graco makes a similar type of catcher that attaches to a pistol's rail, though this would of course replace any light or laser that you might want to practice with.
GracoBrassCatcher.jpg
GracoBrassCatcher.jpg (11.34 KiB) Viewed 6235 times

Caldwell also makes a model that's not attached to your firearm and catches the brass.
CaldwellBrassTrap.jpg
CaldwellBrassTrap.jpg (83.13 KiB) Viewed 6235 times

Assuming your brass does hit the ground, various devices can easily pick it up. This retriever from Caldwell allows brass to squeeze between the wires of its rolling basket, and can quickly pick up much brass from various surfaces including dirt.
CaldwellBrassRetriever.png
CaldwellBrassRetriever.png (111.15 KiB) Viewed 6235 times

Ammo-Up makes a device which picks up brass between rubber fingers.
AmmoUp.jpg
AmmoUp.jpg (143.17 KiB) Viewed 6235 times

Once the brass is picked up, assuming various calibers are used, sorting trays can be used to separate brass into their respective calibers, and to eliminate brass which is not your caliber. Nothing wrong with doing this by hand and eye!
BrassSortingTray.png
BrassSortingTray.png (185.64 KiB) Viewed 6235 times

User avatar
KK6DYO
OAUSA Board Member
Posts: 466
Joined: Thu Aug 29, 2013 9:07 pm
Call Sign: KK6DYO

Re: 2022-01-27 Reloading Net

Post by KK6DYO » Mon Jan 24, 2022 9:40 pm

Decapping / Cleaning / Inspecting

Note that decapping (removing the primer) is usually done concurrently with the resizing step. You (like me) may choose to decap before cleaning to ensure that the primer pocket gets clean, or skip a separate decapping step. If you decap during resizing, you might want to clean the primer pocket as an additional step after resizing.

Decapping and cleaning are of course unnecessary with virgin brass.


Cleaning

Cleaning removes grit and powder residue that can cover the inside, outside, and primer pocket of your case. There are two basic types of cleaning: wet and dry. Note that you'll want to separate cases by caliber to ensure that smaller caliber cases don't get lodged inside other larger caliber cases--possibly with cleaning media--and stay dirty.


Dry Cleaning

In the past, I have dry cleaned using a polishing media such as walnut shell particles lightly coated with polishing compound. This always seemed to leave a bit of polishing dust and dirt on cases, which can be wiped off. Dry cleaning can utilize tumblers or vibratory bins.

Since I no longer dry clean, I'm open to any comments on this.


Wet Cleaning

Ultrasonic cleaning is a variety of wet cleaning, though is easier in that no pins are needed. It's fine for smaller quantities of cases. The level of cleaning isn't nearly as great as tumbling using pins, but is probably quite sufficient to ready the case for reloading.

For wet tumbling, cases are put into a tumbling bin. Water is added, then some type of detergent and usually stainless steel pins, and the cases are tumbled for a set period of time, maybe 30 minutes to 2 hours depending on how dirty the cases are. Ancient cases that you've rescued from dirt at the range would be at the higher end.

I like wet cleaning because it traps the dirt in solution with the water and detergent, which can then be poured off.

I've found this 3.3-liter Frankford Arsenal tumbler to be perfect for my needs since I rarely have more than 50 cases to clean. Frankford also makes a 7-liter version. Various manufacturers make similar products which are likely just as good.
FrankfordArsenalTumbler.png
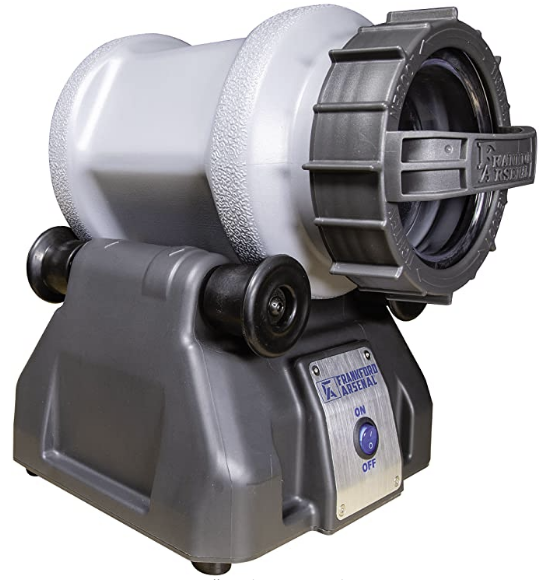
FrankfordArsenalTumbler.png (262.98 KiB) Viewed 6231 times

As a detergent, some people like mixing their own with a bit of Dawn dishwashing detergent, a touch of Lemi Shine, and maybe a dab of NuFinish car polish. I like the results with Hornady One Shot Sonic Clean Solution. Again, there are many similar products. I've tried a few; this works for me and can also be used in an ultrasonic cleaner.
HornadyOneShotSonicSolution.png
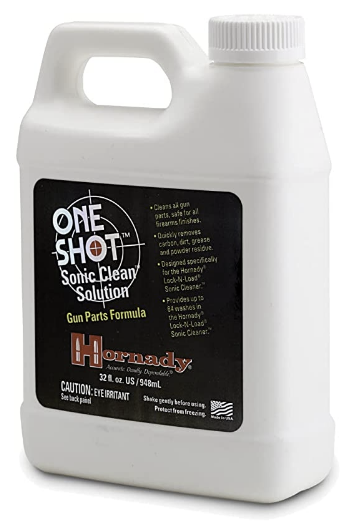
HornadyOneShotSonicSolution.png (114.51 KiB) Viewed 6231 times


Some of my friends (and folks on YouTube) believe they get decent cleaning results without using stainless steel media ("pins") while tumbling brass. I find the pins also do a good job inside the case, especially the case mouth.

I personally like the pins available from Southern Shine Media, which seem to be available primarily on Facebook. The pins are smaller and sharper, and seem to clean the primer pocket well (assuming you decap before cleaning). They do tend to put micro scratches on the brass, but also need a shorter cleaning time. The Southern Shine media is magnetic, so can be handled using magnets.


https://www.facebook.com/southernshinemedia/
SouthernShineMedia.jpg
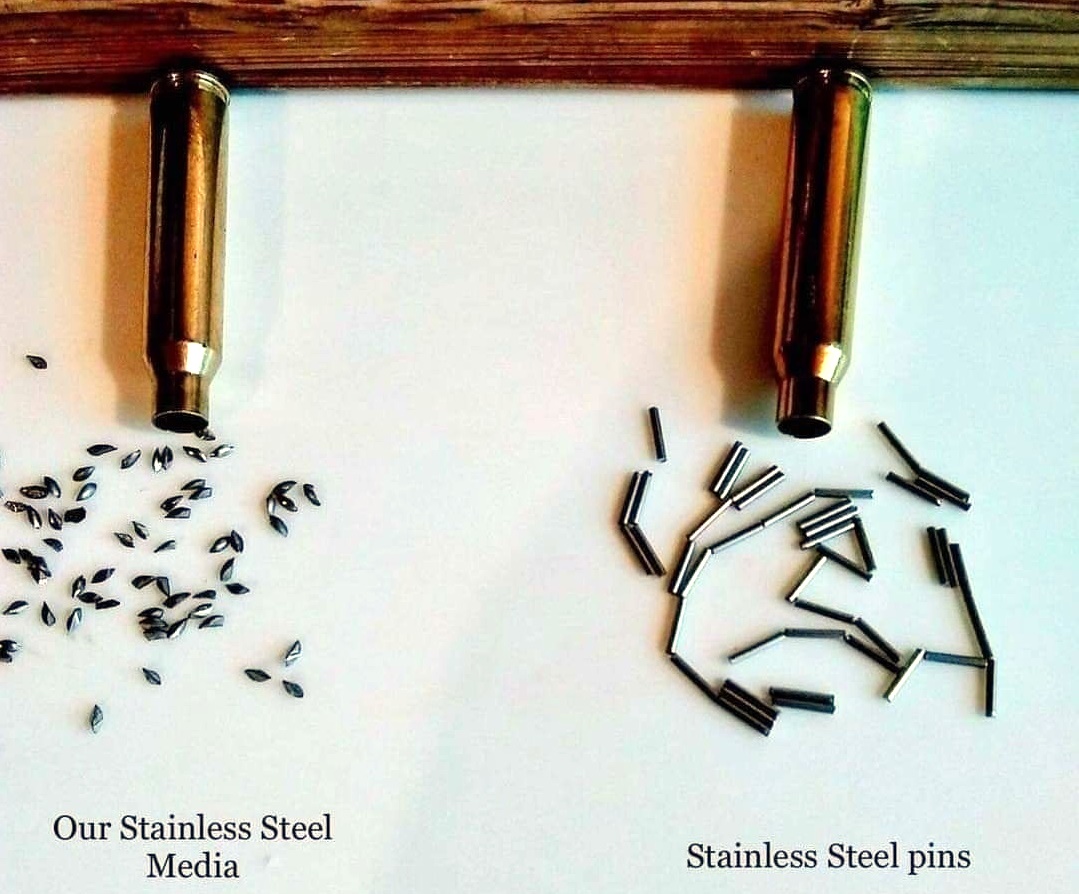
SouthernShineMedia.jpg (262.22 KiB) Viewed 6231 times


After tumbling with pins, the pins must be separated from the brass cases. A media separator does a surprisingly thorough job of this, spinning the pins and cases, letting the pins escape between the slots in the separator. While still in the media separator, I first rinse with tap water. This is a Frankford Arsenal Media Separator.
FrankfordArsenalMediaSeparator.png
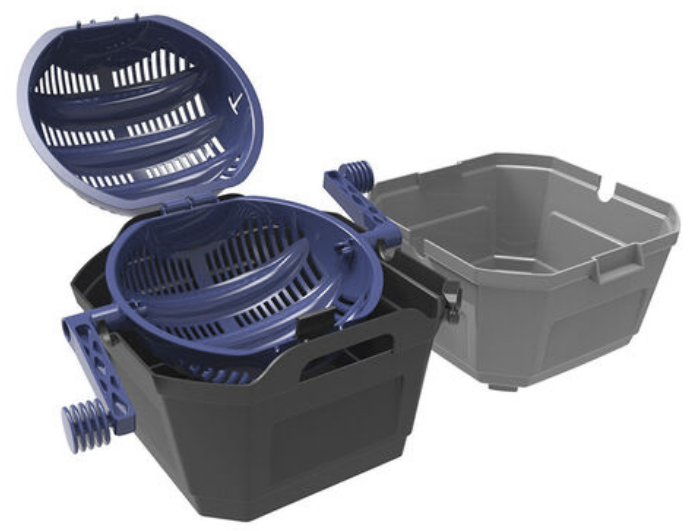
FrankfordArsenalMediaSeparator.png (238.55 KiB) Viewed 6228 times


To remove any remaining pins, I've found that a very strong magnet waved though the brass will pick up the last remaining pins.
https://www.kjmagnetics.com/proddetail. ... DX08TP-N52

After this, to do a final rinse of the cases, I spray them with distilled water while running my hand through them, still in the media separator.


As the near final step, I wipe excess water off the cases with a microfiber towel and dry them.

I have used the oven a number of times, but found that the cases occasionally get a bit discolored plus retain some water spots. Leaving them outside also works, but might take a long time (especially during winter) and result in water spots.

I've been using a dehydrator to quickly (one hours) dry them. There are dehydrators made specifically for this, though I've been using a fruit dehydrator that I found on Amazon.
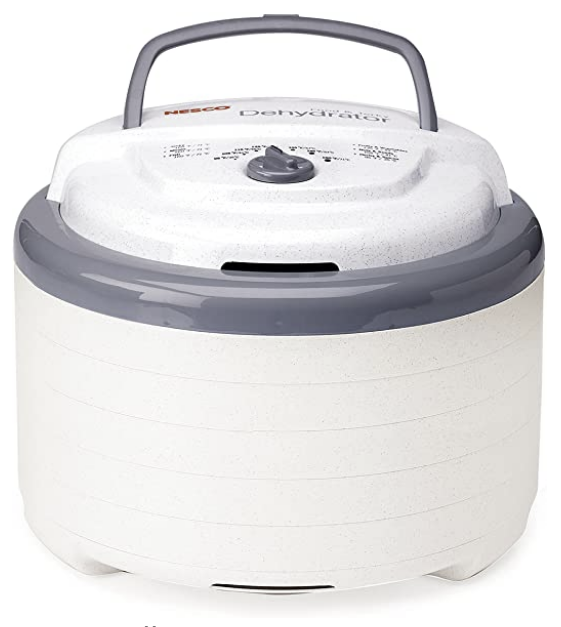
Dehydrator.png
Dehydrator.png (187.37 KiB) Viewed 6228 times

Finally, I check the dried cases to ensure that no pins are inside the case or lodged anywhere, such as the primer pocket or flash hole. again holding a strong magnet near them. This is also a great time to look for any damage such as split mouths or impending case head separation.

Note I also rinse the pins in the bottom of the media separator then use the dehydrator to dry them on top of a shop towel. They're stainless, so won't really rust, but it's an easy step.

User avatar
KK6DYO
OAUSA Board Member
Posts: 466
Joined: Thu Aug 29, 2013 9:07 pm
Call Sign: KK6DYO

Re: 2022-01-27 Reloading Net

Post by KK6DYO » Tue Jan 25, 2022 6:03 pm

At this point, you have brass that's ready to reload.

There is a step that might be thrown in here: annealing.

When you resize the case, the mouth of the case can become brittle though "work hardening", resulting in splits occurring earlier in the life of the case. Annealing reverses this hardening, significantly promoting the life of the case.

Annealing is softening the mouth of the brass case by heating while keeping the body and head from getting too hot. This retains the temper of the body and head to help contain the pressures while firing.

While I don't currently anneal my cases, I'm considering doing this as I would just as soon have my cases last as long as possible.

There are various annealing processes and kits, some using propane flame and some using electricity. Some people fill a pan with water 2/3 to the top of a brass case then play a propane torch past the mouth. Some annealing processes require a second cleaning to eliminate residue.


Example of simple manual annealer using propane:
SimplePropaneAnnealer.jpg
SimplePropaneAnnealer.jpg (113.65 KiB) Viewed 6218 times

The Annealeez automatic annealer:
AnnealeezAnnealer.jpg
AnnealeezAnnealer.jpg (122.73 KiB) Viewed 6218 times

Electrical annealer:
AMPAnnealer.jpg
AMPAnnealer.jpg (98.49 KiB) Viewed 6218 times

Whiz bang automatic electrical annealer:
AMPAnnealerAuto.jpg
AMPAnnealerAuto.jpg (145.8 KiB) Viewed 6218 times

User avatar
KK6DYO
OAUSA Board Member
Posts: 466
Joined: Thu Aug 29, 2013 9:07 pm
Call Sign: KK6DYO

Re: 2022-01-27 Reloading Net

Post by KK6DYO » Tue Jan 25, 2022 6:12 pm

In the following diagrams, which enumerate steps in reloading (using the press and dies), trimming and crimping steps are not shown. Trimming, mostly done for bottleneck rifle cartridges, is done after resizing, which can cause the brass to lengthen. Crimping is done to remove the neck expansion and especially for handgun cartridges, helps to hold the bullet in the case.


Steps for reloading rifle cartridges.
RifleReloading.jpg
RifleReloading.jpg (86.57 KiB) Viewed 6206 times

Steps for reloading pistol cartridges.
PistolReloading.jpg
PistolReloading.jpg (80.78 KiB) Viewed 6206 times

Crimping is either rolled or tapered depending on the die used. Some people use the crimping capability available with the seating die and do both operations simultaneously. Some people crimp separate after bullet seating, and might use a special crimp die (notably the Lee Factory Crimp die).
RollTaperCrimp.png
RollTaperCrimp.png (71.29 KiB) Viewed 6148 times

User avatar
KK6DYO
OAUSA Board Member
Posts: 466
Joined: Thu Aug 29, 2013 9:07 pm
Call Sign: KK6DYO

Re: 2022-01-27 Reloading Net

Post by KK6DYO » Tue Jan 25, 2022 7:01 pm

Even with cleaned cases, we have not yet returned the brass to a condition suitable for assembly of a cartridge. Firing has likely blown out the case--especially the mouth area--beyond the dimensions of a fresh factory load, so we now need to resize the case.

While it may seem by the number of subsequent steps that these are time-consuming, they're individually quick.

A reloading press and dies are used for most of the subsequent steps:
  • decapping (depriming),
  • resizing,
  • expanding the neck,
  • priming the case (seating the primer),
  • belling the mouth (depending on cartridge),
  • adding powder,
  • seating the bullet,
  • crimping the case mouth (depending on cartridge), and
  • final inspection.
Trimming, especially for bottleneck cases, can be done after resizing / expanding, though is a step that doesn't use the press.

The dies are used in conjunction with a press. Each cartridge requires specific dies with a few exceptions (e.g., .38 Special and .357 Magnum). Most manufacturers' dies can be used with any other manufacturer's presses.

There is as expected a wide variety of presses from a number of manufacturers. The basic types are single stage, turret, and progressive. I'll stick with a sampling of presses made by RCBS.


Bottleneck die sets normally consist of a resizing / decapping / neck expanding die and a bullet seating / crimping die. These are normally made of tool steel but can be obtained in carbide for scratch resistance and greater life. There are different types of dies. For example, small base dies are often used to reload cartridges intended for semi-automatics.

Note the set screw in the lock ring used to fix the adjusted depth.
RifleDies.png
RifleDies.png (212 KiB) Viewed 6197 times

Straight wall die sets for most pistol and some rifle cartridges normally consist of a resizing / decapping die, an expander die, and a bullet seating / crimping die. The resizing die can often be obtained with a carbide ring which offer scratch resistance and longer life.
CarbideDies.png
CarbideDies.png (268.23 KiB) Viewed 6206 times

Some seating dies come with micrometer adjustments.
MicrometerDie.jpg
MicrometerDie.jpg (23.87 KiB) Viewed 6177 times


A single-stage press must be set up for each operation. Normally once the resizing and expanding dies are adjusted for a particular press, they can stay that way indefinitely. The bullet seating die adjustment will of course vary depending on the particular bullet. If you have particular loads that you prefer, you can always buy an individual bullet seating die for each one if you don't want to re-adjust.

Normally single-stage presses are used doing a single operation for all cartridges being reloaded to avoid changing dies, though die changing is relatively easy if the adjustment ring is locked down (generally using a set screw). a rough estimate of productivity is 50 rounds per hour.
RCBSPartner.jpg
RCBSPartner.jpg (56.9 KiB) Viewed 6206 times

A turret press permits faster reloading by avoiding die changing between operations. It allows reloading in either a single-stage or progressive-like mode. The turret heads can be separately purchased allowing the setup for particular cartridges or loadings to remain undisturbed. You can supposedly get up to 200 rounds per hour.
RCBSTurret.jpg
RCBSTurret.jpg (82.37 KiB) Viewed 6206 times

A progressive press performs all operations to different cases with one pull of the (long) lever. There are different versions depending on what you want to automate: primer seating, powder charging, bullet feeding. Estimates are up to 600 rounds per hour. Note that any requiring trimming must be done after resizing, which might cut into the estimate.
RCBSProgressive.jpg
RCBSProgressive.jpg (32.87 KiB) Viewed 6206 times

A motorized press takes everything to the next level with output up to 3500 rounds per hours.
AutodrivePress.png
AutodrivePress.png (165.17 KiB) Viewed 6195 times

User avatar
KK6DYO
OAUSA Board Member
Posts: 466
Joined: Thu Aug 29, 2013 9:07 pm
Call Sign: KK6DYO

Re: 2022-01-27 Reloading Net

Post by KK6DYO » Wed Jan 26, 2022 3:13 pm

Lubricating Cases

This is necessary for any bottleneck style case to reduce the tremendous friction necessary to resize. Lubricant makes resizing much easier and avoids scatches or cases getting stick in the sizing die.


Some people mix their own from lanolin oil mixed with 99.9% isopropyl alcohol.


I've used this type of lubricant in the past, and it worked fine. The lube is quite viscous and is applied to and worked into a foam pad. Cases are then rolled horizontally across the pad. The brush is used to put a little lube into the neck of the case to make the expander work more easily.
RCBSCaseLube.png
RCBSCaseLube.png (157.39 KiB) Viewed 6190 times

I've now switched to Imperial. It's a waxy substance which is usually applied using the fingertips to the outside of the case. It's kind of messy, and when I'm resizing cases I end up getting this on my press handle, but no problem really.
ImperialResizingLube.png
ImperialResizingLube.png (339.68 KiB) Viewed 6190 times

If you're using Imperial or similar on the outside of your case, you'll still need something to lube the inside of the neck fo expanding. This Lyman case neck lubricator is similar to others. You dip the neck into the fine mica powder (some use graphite) then push the neck down on a brush. I do this just before using the Imperial.
CaseNeckLube.png
CaseNeckLube.png (209.03 KiB) Viewed 6184 times

This spray lubricant has the advantage of not contaminating primers or powders, so does not have to be cleaned off. Cases are put in a tray neck up, and quickly sprayed, taking care to get some lubricant on all sides and also into the neck. I'm still experimenting with this. It seems to work fine for smaller cases, such as 300 BLK, but I ended up with a stuck case when I tried .308 Winchester.
HornadyCaseLube.png
HornadyCaseLube.png (156.53 KiB) Viewed 6190 times

Other than the Hornady spray lube, I again clean cases using a quick dunk in an ultrasonic cleaner (not tumbling) to remove the lubricant, and of course drying again in the dehydrator. Are there any other techniques for dealing with this?


In case you have some bad luck and get a case stuck in your resizing die, there's a tool for that. Better to have this on hand for when you might need it, than have to wait for one to arrive.
StuckCaseRemover.png
StuckCaseRemover.png (173.18 KiB) Viewed 6187 times

User avatar
KK6DYO
OAUSA Board Member
Posts: 466
Joined: Thu Aug 29, 2013 9:07 pm
Call Sign: KK6DYO

Re: 2022-01-27 Reloading Net

Post by KK6DYO » Wed Jan 26, 2022 7:25 pm

Case Trimming

Case trimming is done to ensure that the cartridge is within specification and can fit the chamber of your rifle but also that any setup for crimping case mouths work similarly for each case.


Calipers (generic from Amazon) are useful to measure cases to assess the need for trimming and later to measure the overall length of the reloaded cartridge to ensure that it conforms to your loading data.
Calipers.png
Calipers.png (53.01 KiB) Viewed 6152 times

There are a few types of case trimmers available. This manual trimmer from Lee consists of a shank with cartridge holder, a cutter, a shellholder and case length gauge which are purchased separately for each caliber. I've found that these work fine. The wooden knob is an upgraded way to hold the cutter. Cases are put into the shell holder, tightened against the shank which is in a hand drill. The case is spun up and the case length gauge / cutter combination is inserted into the case. The case length gauge has a pin which extends through the flash hole which stops cutting action when the pin contacts the shank. It's relatively inexpensive and I believe sufficiently accurate.
LeeCaseTrimmer3.png
LeeCaseTrimmer3.png (215.06 KiB) Viewed 6180 times
LeeCaseTrimmer1.png
LeeCaseTrimmer1.png (131.18 KiB) Viewed 6180 times
LeeCaseTrimmer2.png
LeeCaseTrimmer2.png (197.98 KiB) Viewed 6180 times

Cutting back the case mouth results in a bur which is removed with a deburring tool. One end is for the inside of the case mouth, the other is for the outside.
CaseDeburringTool.png
CaseDeburringTool.png (169.52 KiB) Viewed 6180 times

A typical type of trimmer is this one by Forster, which is similar to many others. The case is put into a small chuck then the cutting head (which is previously adjusted) is used to trim back the case mouth while a pilot centers the cutter.
ForsterCaseTrimmer.jpg
ForsterCaseTrimmer.jpg (44.21 KiB) Viewed 6180 times

There are other case trimmers that purport to do a better or faster job. This is the Little Crow WFT2 World's Finest Trimmer, their new version which can be used with different calibers by swapping a collet inside the trimmer. It trims relative to the cartridge shoulder. I've got one, but haven't experimented much yet to see if it's the world finest.
86CA6038-D265-4D8C-888B-05C34E5A5199.png
86CA6038-D265-4D8C-888B-05C34E5A5199.png (412.38 KiB) Viewed 6162 times

I don't have this Giraud. but everything I read is good. I assume they last a long time because I saw many for sale.
GiraudTrimmer.jpg
GiraudTrimmer.jpg (59.41 KiB) Viewed 6145 times

I don't have this, but this Frankford Arsenal Trimmer and Case Prep Center supposedly makes case preparation much faster, providing motorized trimming, deburring, and primer pocket cleaning.
CasePrepMotorizedTool.png
CasePrepMotorizedTool.png (146.86 KiB) Viewed 6180 times

User avatar
KK6DYO
OAUSA Board Member
Posts: 466
Joined: Thu Aug 29, 2013 9:07 pm
Call Sign: KK6DYO

Re: 2022-01-27 Reloading Net

Post by KK6DYO » Wed Jan 26, 2022 8:46 pm

Depriming

Depriming will be done either before cleaning, or on the press using the depriming feature of the resizing die.

On rare occasions you may need to punch out live primers. When doing so, I put on hearing protection and do this outside, pointing the case head away from my body. I've never had one go off.

My preference is to deprime as a separate operation before cleaning, since I prefer to get the primer pockets clean while wet tumbling the brass. My preferred depriming tool is this one from Frankford Arsenal. It comes with two collets which cover just about all calibers.

I deprime wearing rubber gloves to avoid getting any chemical residue on my skin. Is this being overly cautious?
DeprimerTool.png
DeprimerTool.png (93.58 KiB) Viewed 6142 times

A different style of depriming tool.
HarveyDeprimingTool.jpg
HarveyDeprimingTool.jpg (145.64 KiB) Viewed 6142 times

Once the spent primer has been punched out, the primer pocket can optionally be cleaned (unless a subsequent cleaning step will do this). This type of primer pocket cleaner has a dull blade that is rotated within the primer pocket to scrap out any residue by twirling it between your fingers. One side is for large primer pockets while the other is for small. Better do this over a container instead of your living room carpet, as a bit of dust and crud will be scraped out. I stopped using this style when it seemed that some primer pockets were becoming enlarged.
PrimerPocketCleaner.png
PrimerPocketCleaner.png (78.22 KiB) Viewed 6141 times

An alternative to the scraper style pocket clear is the brush, coming in large and small brush sizes. It's a bit easer to use due to the handle, and seems to clean well.
PrimerPocketBrush.jpg
PrimerPocketBrush.jpg (341.75 KiB) Viewed 6142 times

Again, I count on wet tumbling with pins to clean the primer pockets.


Priming

Priming is the first step after the case is fully ready for reloading.

Note that primers come in large and small, rifle and pistol, magnum and standard. The size (large or small) and type (rifle or pistol) are determined by the caliber and brass. For example, .45 ACP is available with both large and small primer pockets. Whether magnum or standard is specified with your reloading information / manual and generally depends on how slow-burning your power is.

The primer tray key feature is having grooves such that when fill with primers and agitated, the sharper edges at the opening of the primer catch on the grooves and flip the primer over, eventually resulting in all primers having the same orientation. if you want the opposite orientation, you put the lid on the day and flip it over, then remove the tray from the top.

Having all primers with the same orientation facilitates picking them up either by hand or with a tube designed for automatic feeding. I try to avoid handling primers as the oils on my skin might change their power.
PrimerTray.png
PrimerTray.png (265.25 KiB) Viewed 6142 times

Most presses come with a priming attachment. Priming is done as a separate step after resizing (also after trimming).


Manufacturers make a variety of priming tools. This hand-operated one is typical, with a built-in primer tray. It requires a shell holder that fits the case, often the same one that your press might use. Primers are "automatically" fed by shaking the tray, which has a cover to ensure that primers don't fall out. These tools allow you to feel when the primer is seated properly.
PrimingTool.png
PrimingTool.png (97.4 KiB) Viewed 6142 times

My preferred priming tool is from RCBS. Once the primers are oriented in a tray, a tube is filled simply by successively pushing the tube down on each primer. As each case is primed, a new primer is gravity fed, ready for the next case. This tool also uses a shell holder. It provides better leverage for seating primers, being attached to your reloading table, but still permits a good seating feel, though by arm rather than hand. There are two different tubes for large and small primers.
AutoPrimingTool.png
AutoPrimingTool.png (98.6 KiB) Viewed 6142 times

Post Reply

Return to “OFF-TOPIC DISCUSSIONS”

Who is online

Users browsing this forum: No registered users and 1 guest